If your basement floods or smells damp after heavy rain, a properly installed sump pump can stop water before it damages your belongings and your home’s foundation. A correctly chosen and installed sump pump removes basin water automatically and lowers flood risk, giving you reliable protection when you need it most.
In this article Sump Pump Installation You’ll learn what equipment matters, how placement and discharge affect performance, and what common pitfalls to avoid so the system actually works when conditions demand it. Follow practical, step-by-step guidance that helps you decide whether to hire a pro or tackle the installation yourself with confidence.
Sump Pump Installation Essentials
You need to know what a sump pump does, which styles exist, and how to pick a model that fits your basement’s conditions and electrical setup. The next subsections break down function, common types, and key selection criteria.
What Is a Sump Pump?
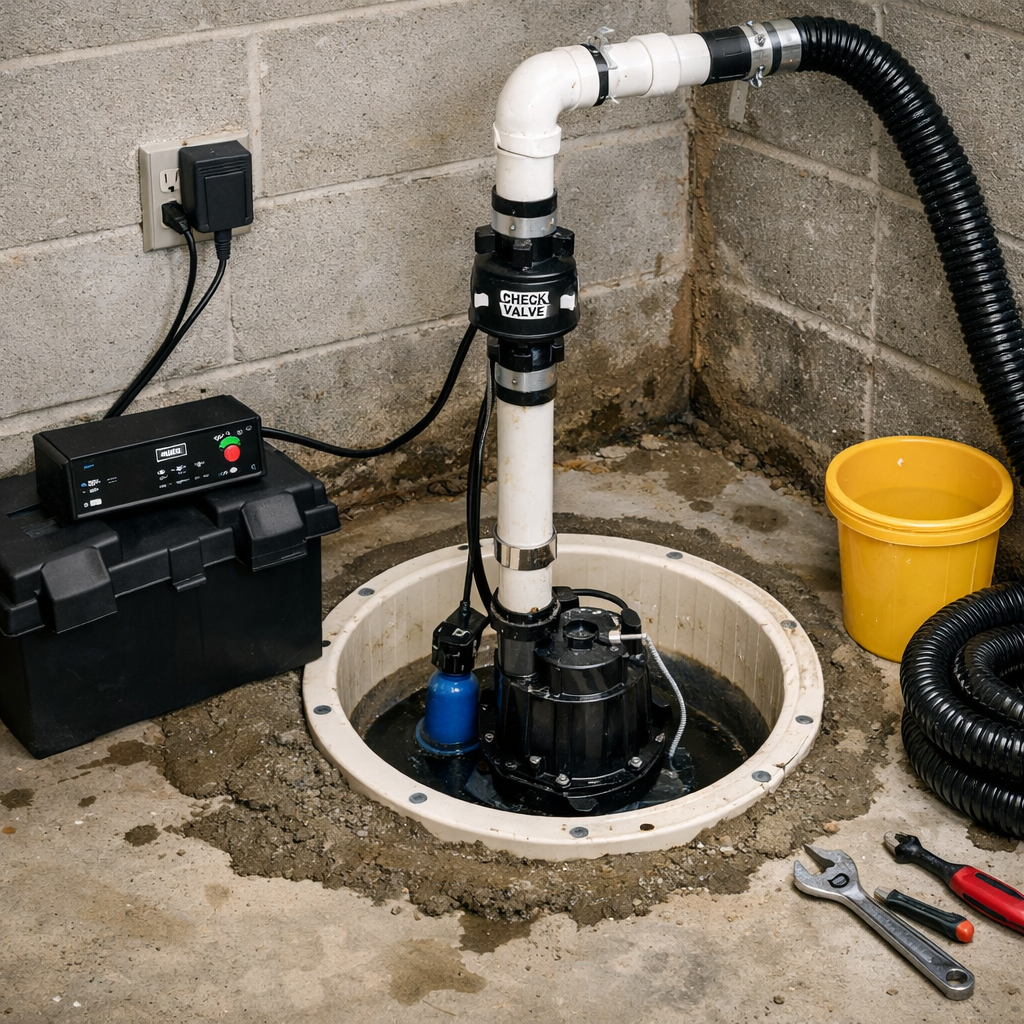
A sump pump is a mechanical device that removes accumulated water from a low point — usually a sump pit in your basement or crawl space. It senses rising water and pumps it away from your foundation to a safe discharge point above grade or into a storm drain.
You’ll typically install the pump in a 12–24 inch diameter pit lined with gravel and a pre-cast basin. The pump connects to PVC discharge pipe, a check valve to prevent backflow, and a power source; battery backup or generator options add redundancy. Regular testing and periodic cleaning of the pit and intake screen keep the pump reliable.
Types of Sump Pumps
Submersible pumps sit inside the sump pit and combine motor and pump in one sealed unit. They run quieter and save space, but replacement requires lifting the unit from the pit. Pedestal pumps have a motor mounted above the pit with a long shaft to the impeller; they’re easier to service but take more headroom and are noisier.
You’ll also find automatic pumps that use a float switch or pressure sensor, and manual units you can activate as needed. Consider pumps rated for solids if your pit collects sediment or grit. Look at horsepower (1/3 to 1 HP common) and maximum head (vertical lift) to match your site’s distance to discharge.
Choosing the Right Sump Pump Model
Start by measuring your pit depth, the distance and vertical lift to the discharge point, and how many gallons per minute (GPM) you need during peak inflow. Use a pump curve or manufacturer chart: for example, a 1/3 HP submersible usually moves 40–50 GPM at short lift but much less at 10–15 feet of head.
Choose materials resistant to corrosion (stainless steel or thermoplastic for the pump housing) and a reliable float or electronic sensor. Add a check valve to stop backflow and a battery backup sized to run the pump for several hours during outages. Finally, confirm electrical requirements (dedicated GFCI outlet, correct voltage) and local code for discharge routing before purchasing.
Step-by-Step Sump Pump Installation Guide
You will prepare the site, set the basin, complete wiring and plumbing, then test and maintain the system. Follow measured steps, use proper safety gear, and confirm local codes for discharge and electrical work.
Site Preparation and Safety Measures
Select the lowest point in the basement or crawl space within 10–20 feet of a GFCI-protected outlet. Measure clearance so the basin sits flush with the finished floor; mark a 22–24 inch diameter circle for a typical 18–20 inch basin.
Turn off power at the breaker and use a non-contact voltage tester before touching wiring. Wear eye protection, dust mask, gloves, and knee pads. Ensure good ventilation if cutting concrete; use a wet saw or hammer drill with masonry bit and control dust with a shop vac.
Check local code for required discharge distance from foundation (often 10–20 feet) and whether a permit or licensed electrician is needed. Plan the discharge route and avoid routing through HVAC condensate lines or sanitary sewers unless code allows.
Installing the Sump Basin
Dig a hole about 6 inches wider and at least 2–3 inches deeper than the basin bottom so you can level it on a gravel pad. Compact 3–4 inches of ¾ inch crushed stone and level it using a spirit level.
Place the basin centered in the hole and verify the rim is flush or slightly below the finished floor. Backfill around the basin with gravel to secure it; tamp gently and keep gravel below the rim. Install the removable lid and a raised debris grate if the basin will be exposed to loose materials.
Position the pump on a stable, level platform at the center of the basin. If you use a pedestal pump, secure the base per manufacturer instructions. Install a check valve on the discharge pipe close to the pump to prevent backflow and cycling.
Wiring and Plumbing Considerations
Use a dedicated 120V GFCI circuit for most residential pumps; confirm pump voltage and breaker size on the nameplate. Hardwiring requires a licensed electrician in many jurisdictions—use an outlet only if local code permits. Keep the pump cord routed through a watertight strain-relief bushing in the lid.
Use schedule 40 PVC for discharge piping and solvent-weld joints for leak-free connections. Include a union or threaded adapter near the pump for service removal. Maintain a continuous slope away from the foundation; install a swing check or mechanical check valve with a weep hole or bypass per manufacturer guidance.
Terminate the discharge line at least the code-required distance from the foundation, or tie into storm sewer only if allowed. Protect exposed discharge piping from freezing with heat tape and insulation in cold climates. Secure piping to walls with straps every 3–4 feet to prevent vibration and sagging.
System Testing and Maintenance Tips
Prime the pit with clean water until the pump activates to confirm float operation. Cycle the pump manually by lifting the float to ensure pump and check valve function; watch for leaks at all joints. Measure run time—long, continuous runs indicate heavy inflow or undersized pump.
Install a battery backup or a secondary pump if your area has frequent outages or heavy groundwater. Test backup batteries monthly and replace per manufacturer schedule. Clean the basin and remove silt or debris every 6–12 months; inspect the check valve and discharge pipe for obstructions.
Record pump model, installation date, and service intervals. Replace pumps every 7–10 years or sooner if you notice reduced flow, loud bearings, or frequent cycling. Keep a spare check valve and basic PVC fittings on hand for quick repairs.